Hiển thị các bài đăng có nhãn CEH v8 Labs Module 03 Scanning Networks. Hiển thị tất cả bài đăng

Thứ Năm, 24 tháng 4, 2014

Scanning Networks - p.19

Lab 18

Scanning Devices in a Network Using The Dude

The Dnde automatically scans all devices within specified subnets, draws and lays out a wap of your networks, monitors services of your devices, and a/eftsyon in case some service has p roblems.

Lab Scenario

111 the previous lab you learned how packets can be captured using Colasoft Packet Builder. Attackers too can sniff can capture and analyze packets from a network and obtain specific network information. The attacker can disrupt communication between hosts and clients by modifying system configurations, or through the physical destruction of the network. As an expert ethical hacker, you should be able to gadier information on organizations network to ch e ck for vulnerabilities and fix them before an attacker g e ts to compromise the machines using th o se vulnerabilities. If you detect any attack that has been performed on a network, immediately implement preventative measures to stop any additional unauthorized access. in this lab you will learn to use The Dude tool to scan the devices in a network and the tool will alert you if any attack has been performed on the network.

Lab Objectives

The objective of diis lab is to demonstrate how to scan all devices widiin specified subnets, draw and layout a map of your networks, and monitor services in the network.

Lab Environment

To carry out the lab, you need:

■ The Dude is located at D:\CEH-T00ls\CEHv8 Module 03 Scanning Networks\Network Discovery and Mapping Tools\The Dude
■ You can also download the latest version of The Dude from the http: / / www.1nikiodk.com / thedude.php

■ If you decide to download the latest version, then sc r e en sh o ts shown
in the lab might differ
■ A computer running Windows Server 2012
■ Double-click die The Dude and follow wizard-driven installation steps to install The Dude
■ Administrative privileges to run tools

Lab Duration

Time: 10 Minutes

Overview o f The Dude

The Dude network monitor is a new application that can dramatically improve die way you manage your network environment It will automatically scan all devices within specified subnets, draw and layout a map of your networks, monitor services of your devices, and alert you in case some service lias problems.

Lab Tasks

1. Launch the Start menu by hovering the mouse cursor on the lower-left corner of the desktop.

FIGURE 18.1: Windows Server 2012 - Desktop view
2. in the Start menu, to launch The Dude, click The Dude icon.

FIGURE 182: Windows Server 2012 - Start menu
3. The main window of The Dude will appear

FIGURE 18.3: Main window of The Dude
4. Click the Discover button on the toolbar of die main window.

FIGURE 18.4: Select discover button

5. The Device Discovery window appears

FIGURE 18.6: Device discovery ^־uxicra־

6. in the Device Discovery window, specify Scan Networks range, select default from die Agent drop-down list, select DNS, SNMP, NETBIOS, and IP from die Device Name Preference drop-down list, and click Discover.

FIGURE 18.7: Selecting device name preference
7. Once the scan is complete, all the devices connected to a particular network will be displayed.

FIGURE 18.8: Overview of network connection
8. Select a device and place die mouse cursor on it to display the detailed information about diat device.

FIGURE 18.9: Detailed information of the device
9. Now, click the down arrow for die Local drop-down list to see information on  History Actions, Tools, Files. Logs, and so on.

FIGURE 18.10: Selecting Local information

10. Select options from die drop-down list to view complete information.


FIGURE 18.11: Scanned network complete information
11. As described previously, you may select all the other options from the drop-down list to view die respective information.

12. Once scanning is complete, click the button to disconnect.

FIGURE 18.12: Connection of systems in network

Lab Analysis

Analyze and document die results related to die lab exercise


Scanning Networks - p.18

Lab 17

Scanning the Network Using the Colasoft Packet Builder

The Colasoft Packet Builder is a useful tool for creating custom nehrork packets.

Lab Scenario

In the previous lab you have learned how you can detect, delete, and block cookies. Attackers exploit die XSS vulnerability, which involves an attacker pushing malicious JavaScript code into a web application. When anodier user visits a page widi diat malicious code in it, die user’s browser will execute die code. The browser lias noway of telling the difference between legitimate and malicious code. Injected code is anodier mechanism diat an attacker can use for session liijacking: by default cookies stored by the browser can be read by JavaScript code. The injected code can read a user’s cookies and transmit diose cookies to die attacker.

As an expert ethical hacker and penetration te s te r you should be able to prevent such attacks by validating all headers, cookies, query strings, form fields, and hidden fields, encoding input and output and filter meta characters in the input and using a web application firewall to block the execution of malicious script.

Anodier method of vulnerability checking is to scan a network using the Colasoft Packet Builder. in this lab, you will be learn about sniffing network packets, performing ARP poisoning, spoofing the network, and DNS poisoning.

Lab Objectives

The objective of diis lab is to reinforce concepts of network security policy, policy enforcement, and policy audits.

Lab Environment

in this lab, you need:

■ Colasoft Packet Builder located at D:\CEH-Tools\CEHv8 Module 03 Scanning Networks\Custom Packet Creator\Colasoft Packet Builder

■ A computer running Windows Server 2012 as host machine

■ Window 8 running on virtual machine as target machine
■ You can also download die latest version of Advanced Colasoft Packet Builder from die link http:/ / www.colasoft.com/download/products/download_packet_builder. php
■ If you decide to download die latest version, dien screenshots shown in die lab might differ.
■ A web browser widi Internet connection nuuiing in host macliine

Lab Duration

Time: 10 Minutes

Overview o f Colasoft Packet Builder

Colasoft Packet Builder creates and enables custom network packets. This tool can be used to verify network protection against attacks and intmders. Colasoft Packet Builder features a decoding editor allowing users to edit specific protocol field values much easier. Users are also able to edit decoding infonnation in two editors: Decode Editor and Hex Editor. Users can select any one of die provided templates: Ethernet Packet, IP Packet, ARP Packet, or TCP Packet.

Lab Tasks

1. Install and launch die Colasoft Packet Builder.
2. Launch the Start menu by hovering die mouse cursor on the lower-left corner of the desktop.

FIGURE 17.1: Windows Server 2012 - Desktop view
3. Click the Colasoft Packet Builder 1.0 app to open the Colasoft Packer Builder window

FIGURE 17.2 Windows Server 2012 - Apps
4. Tlie Colasoft Packet Builder main window appears

FIGURE 17.3: Colasoft Packet Builder main screen

5. Before starting of vonr task, check diat die Adapter settings are set to default and dien click OK.

FIGURE 17.4: Colasoft Packet Builder Adapter settings
6. To add 01 create die packet, click Add 111 die menu section

FIGURE 17.5: Colasoft Packet Builder creating die packet
7. When an Add Packet dialog box pops up, you need to select die template and click OK.

FIGURE 17.6: Cohsoft Packet Builder Add Packet dialog box

8. You can view die added packets list 011 your right-hand side of your window.

FIGURE 17.7: Colasoft Packet Builder Packet List
9. Colasoft Packet Builder allows you to edit die decoding information in die two editors: Decode Editor and Hex Editor.

FIGURE 17.8: Cohsoft Packet Builder Decode Editor
FIGURE 17.9: Colasoft Packet Builder Hex Editor
10. To send all packets at one time, click Send All from die menu bar.

11. Check die Burst Mode option in die Send All Packets dialog window, and dien click Start.

FIGURE 17.10: Colasoft Packet Builder Send All button

FIGURE 17.11: Colasoft Packet Builder Send AH Packets

12. Click Start

FIGURE 17.12 Colasoft Packet Builder Send AH Packets
13. To export die packets sent from die File menu, select File Export - All Packets.

FIGURE 17.13: Export All Packets potion

FIGURE 17.14: Select a location to save the exported file

FIGURE 17.15: Colasoft Packet Builder exporting packet


Lab Analysis
Analyze and document die results related to the lab exercise.

Questions

1. Analyze how Colasoft Packet Builder affects your network traffic while analyzing your network.
2. Evaluate what types of instant messages Capsa monitors.
3. Determine whether die packet buffer affects performance. If yes, dien what steps do you take to avoid or reduce its effect on software?


Scanning Networks - p.17

Lab 16

Detect, Delete and Block Google Cookies Using G-Zapper

G-Zapper is a utility to block Goog/e cookies, dean Google cookies, and help yon stay anonymous nhile searching online

Lab Scenario

You have learned in die previous lab diat MegaPing security scanner checks your network for potential vulnerabilities that might be used to attack your network, and saves information in security reports. It provides detailed information about all computers and network appliances. It scans your entire network and provides information such as open shared resources, open ports, services/drivers active on the computer, key registry entries, users and groups, trusted domains, printers, etc. Scan results can be saved in HTML 01־ TXT reports, which can be used to secure your network. As an administrator, you can organize safety measures by shutting down unnecessary ports, closing shares, etc. to block attackers from intruding the
network. As another aspect o f prevention you can use G-Zapper, which blocks Google cookies, cleans Google cookies, and helps you stay anonymous while searching online. This way you can protect your identity and search history.

Lab Objectives
This lab explain how G-Zapper automatically d e te c ts and c le a n s the Google cookie each time you use your web browser.
Lab Environment
To carry out the lab, vou need:

G-Zapper is located at D:\CEH-Tools\CEHv8 Module 03 Scanning Networks\Anonymizers\G-Zapper

You can also download die latest version of G־Zapper from the link littp://www. dummysoftware.com/

If you decide to download the la te st version, then screenshots shown in the lab might differ

Install G-Zapper 111 Windows Server 2012 by following wizard driven installation steps

Lab Duration

Time: 10 Minutes

Overview of G-Zapper

G-Zapper helps protect your identity and search history. G-Zapper will read die Google cookie installed on your PC, display die date it was installed, determine how long your sear ch es have been tracked, and display your Google searches. GZapper allows you to automatically delete or entirely block die Google search cookie from future installation.Administrative privileges to run tools A computer running Windows Server 2012

Lab Tasks

1 . Launch the Start menu by hovering die mouse cursor on the lower-left comer of the desktop.

FIGURE 16.1: Windows Server 2012 - Desktop view
2. Click die G-Zapper app to open die G־Zapper window.

FIGURE 162: Windows Server 2012 - Apps
3. The G-Zapper main window will appear as shown in die following screenshot.

FIGURE 16.3: G-Zapper main windows
4. To delete the Google search cookies, click the Delete Cookie button; a window will appear that gives information about the deleted cookie location. Click OK

FIGURE 16.4: Deleting search cookies
5. To block the Google search cookie, click die Block cookie button. A window will appear asking if you want to manually block the Google cookie. Click Yes

FIGURE 16.5: Block Google cookie

6. It will show a message diat the Google cookie has been blocked. To verify, click OK

FIGURE 16.6: Block Google cookie (2)
7. To test the Google cookie that has been blocked, click the Test Google button.

8. Yoiu default web browser will now open to Google’s Preferences page. Click OK.

FIGURE 16.7: Cookies disabled massage
9. To view the deleted cookie information, click die Setting button, and click View Log in the cleaned cookies log .

FIGURE 16.8: Viewing the deleted logs
10. The deleted cookies information opens in Notepad.

FIGURE 16.9: Deleted logs Report
Lab Analysis

Document all the IP addresses, open ports and running applications, and protocols you discovered during die lab.


Questions

1. Examine how G-Zapper automatically cleans Google cookies.
2. Check to see if G-zappei is blocking cookies on sites other than Google


Scanning Networks - p.16

Lab 15


Basic Network Troubleshooting Using MegaPing

MegaPing is an ultimate toolkit thatprovides complete essential utilities for information system administrator and IT solution providers.

Lab Scenario

You have learned in the previous lab that HTTP tunneling is a technique where communications within network protocols are captured using the HTTP protocol. For any companies to exist on the Internet, they require a web server. These web servers prove to be a high data value target for attackers. Tlie attacker usually exploits die WWW server running IIS and gains command line access to the system. Once a connection has been established, the attacker uploads a precompiled version o f the HTTP tunnel server (lits). With the lits server set up the attacker then starts a client on his 01־ her system and directs its traffic to the SRC port of the system running the lits server. This lits process listens on port 80 of the host WWW and redirects traffic. Tlie lits process captures the traffic in HTTP headers and forwards it to the WWW server port 80, after which the attacker tries to log in to the system; once access is gained he or she sets up additional tools to further exploit the network. MegaPing security scanner checks your network for potential vulnerabilities that might be used to attack your network, and saves information in security reports. in this lab you will learn to use MegaPing to check for vulnerabilities and troubleshoot issues.

Lab Objectives

This lab gives an insight into pinging to a destination address list. It teaches how to:
■ Ping a destination address list
■ Traceroute
■ Perform NetBIOS scanning

Lab Environment

To cany out die lab, you need:

■ MegaPing is located at D:\CEH-Tools\CEHv8 Module 03 Scanning Networks\Scanning Tools\MegaPing
■ You can also download the latest version of Megaping from the link http: / / www.magnetosoft.com/
■ If you decide to download the la te st version, then screenshots shown in the lab might differ
■ Administrative privileges to run tools
■ TCP/IP settings correcdy configured and an accessible DNS server
■ This lab will work in the CEH lab environment, on Windows Server 2012, Windows 2008, and Windows 7
Lab Duration

Time: 10 Minutes

Overview of Ping

Tlie ping command sends Internet Control Message Protocol (ICMP) echo request packets to die target host and waits for an ICMP response. During diis requestresponse process, ping measures die time from transmission to reception, known as die round-trip time, and records any loss packets.

Lab Tasks

1. Launch the Start menu by hovering die mouse cursor on the lower-left corner of the desktop.

FIGURE 13.1: Windows Server 2012 - Desktop view
2. Click die MegaPing app to open die MegaPing window.

FIGURE 15.2: Windows Server 2012 - Apps
3. the MegaPing main window, as shown in the following figure

Figure 15.3: MegaPing main windows
4. Select any one of die options from the left pane of the window.

5. Select IP scanner, and type in the IP range in die From and To field; in this lab the IP range is from 10.0.0.1 to 10.0.0.254. Click Start

6. You can select the IP range depending on your network.

FIGURE 15.4: MegaPing IP Scanning
7. It will list down all the IP ad d r e sse s under that range with their TTL (Time to Live), Status (dead or alive), and die s ta tis tic s of the dead and alive hosts.

FIGURE 15.5: MegaPing IP Scanning Report
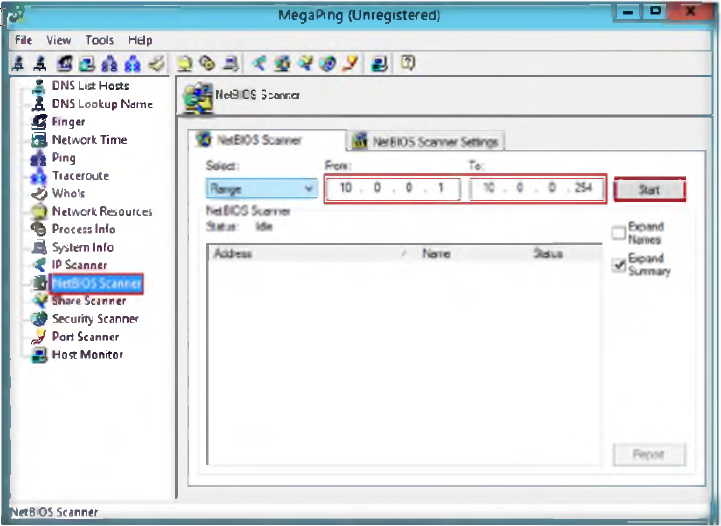
8. Select the NetBIOS Scanner from the left pane and type in the IP range in the From and To fields. 111 this lab, the IP range is from 10.0.0.1 to 10.0.0.254 Click Start

FIGURE 15.6: MegaPing NetBIOS Scanning
9. The NetBIOS scan will list all the hosts with their NetBIOS names and adapter addresses

FIGURE 15.7: MegaPing NetBIOS Scanning Report
10. Right-click the IP address. 111 this lab, the selected IP is 10.0.0.4; it will be different in your network.

11. Then, right-click and select the Traceroute option.

FIGURE 15.8: MegaPing Traceroute
12. It will open the Traceroute window, and will trace die IP address selected.

FIGURE 15.9: MegaPing Traceroute Report
13. Select Port Scanner from die left pane and add www.certifiedhacker.com 111 the Destination Address List and then click the Start button.

14. After clicking the Start button it toggles to Stop

15. It will lists the ports associated with www.certifiedl1acker.com with die keyword, risk, and port number.

FIGURE 15.10: MegaPing Port Scanning Report
Lab Analysis

Document all die IP addresses, open ports and running applications, and protocols you discovered during die lab


Questions

1. How does MegaPing detect security vulnerabilities on die network?
2. Examine the report generation of MegaPing.